If you’re interested in earning money online, getting started with freelancing, or creating a professional presence online, starting a personal website or blog is a MUST.
There are many different things you can do with a website or blog, and endless ways to use a blog to help you earn more money and score the jobs you want. (Or create your own job.) We also recommend that every college student and graduate must have their own website to showcase themselves.
Starting a blog is a fairly easy process, even if you have limited technical skills. It can all be done in about 15 minutes to an hour, depending on your technical prowess.
We've worked hard to make the guide easy to understand. It's a long article, but it will take you step by step through the entire process, from having absolutely nothing, to a fully functional website.
Understanding How A Website Works
The first thing to know is how the web works, and how websites are created. This will help you really understand the process better.
There are three main parts of a website for you to know:
- The Domain - This is the URL or web address of a particular website
- Web Hosting - This is the physical computer a website is stored on.
- The Website - These are the files that actually are the website.
To get started, you need to buy a domain, find a web hosting solution, and then create the website that people will actually see. It sounds complicated, but it's really easy and we will walk you through it.
Video Tutorial
Step 1 - Find A Domain And Hosting
The first step in getting started is to find a domain name and setup hosting. For this tutorial, we are going to use Bluehost to do both. Bluehost is a web hosting company that also makes getting a domain name easy, and they do it in one simple step.
When you use my link to Bluehost, you get a discount so that you'll only pay $2.95 per month. That saves you $5 per month on hosting right there! You won't find a better deal on hosting than this!
1.1 Visit Bluehost and Get Started
Visit Bluehost (this link will open in a new tab) and select Get Started. We use WordPress hosting, and we'll tell you more about this later.
1.2 Select Your Hosting Plan
After clicking WordPress Hosting you’ll be directed a new page. Scroll down toward the bottom of the page and you’ll see the plan options.
If you’re looking to have just one personal website or blog the first plan at $2.95/month will work. If you want to set up two different blogs the standard plan is a good choice. (Remember, you can always upgrade your plan at a later date if you need to.)
1.3 Choosing Your Domain Name
On the next page you’ll be able to choose your domain name. When choosing a domain name it’s important to put some thought into the name of your website or blog. Having several options in mind is a good idea since it can be hard finding a good available name. If you can’t think of a good domain name, using your first and last name is always a viable option.
For a personal website, we strongly recommend using your name, or a close variation of your name. For example, it could be firstnamelastname.com or firstnamemiddleinitiallastname.com.
When you type your chosen domain name into the bar Bluehost will automatically let you know whether or not that name is available.
Always go with a .com name if at all possible as those are the easiest for others to remember. If you want, you can also purchase all the variations of your site name (such as .net, .org, .co, and more). This isn't required, but it's an option if you want to.
1.4 Finish Registration
After you secure a domain name, finish filling out the rest of the registration page by doing the following:
- Choose the starter or standard plan based on what you originally selected above
- Choose the billing cycle you prefer (36 months get the best discount, and you can always cancel and get a refund at any time)
- Fill in your billing information
- Choose any additional services you'd like (this is optional and NOT needed)
- Review your order details and place your order
Step 2 - Setting Up Your Personal WordPress Website
After you finish registering with Bluehost, you'll get several confirmation emails, including the important information about how to get started.
2.1 Finish Installing WordPress
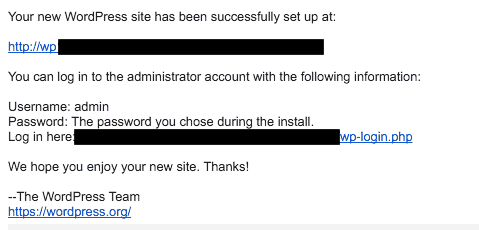
The first step is to finish installing your WordPress site, including setting up the login information. You need to check your email, because the link to update your login information was sent to you there. Make sure you check your spam email folder if you didn't get it.

Don't freak out if you click the link and it says your website is "Not Found". When you create a new website, it can take several hours for it to be reachable online. Use that time to read through the rest of this guide so you know what to expect.
2.2 Understanding How WordPress Works
WordPress is like an operating system for your website. It handles all the backend, and it has some really great features that make it easy to use. A lot of major websites like the New York Times and Forbes use WordPress because it's so customizable.
When you first log in, you'll encounter the WordPress Dashboard:

The Dashboard is your home base, but honestly, you're not going to use it much. Instead, you're going to use all of the links on the sidebar. You will not have all the features of my site because of the customizability of WordPress. However, every WordPress website has the following:
Posts - These are the "articles" on your site. If you run a blog-format website, these are your blog posts.
Media - These are images and files that you upload. The picture of the dashboard above is a media item.
Links - These are links to other sites. You may or may not use this feature. I don't.
Pages - These are the main pages of your site, such as your About Page, Contact Page, etc.
Comments - If you want people to comment on your website, you can moderate comments here.
Appearance - This is where you control the look and feel of your site. We're going to talk themes below.
Plugins - You can customize your personal website by using plugins, which we will talk about below.
Users - You can create users on your site (you are already a user), and manage existing users here.
Tools - There are some tools here that you can use, but it's highly unlikely and we won't cover it.
Settings - This is where the important settings are maintained. You should access this once and be done.
2.3 Important Setting For Your Personal WordPress Website
Before you start creating content on your new personal website, you need to make sure you update the following settings.
Settings -> General - >
On the General Tab, make sure that you update your site name, site URL, email address, and time zone. Some of these may be done already, but others may not be.
Settings -> Reading ->
On this tab, you need to make a decision about how you want your website to be setup. Do you want your homepage to be a static webpage (like The College Investor is), or do you want it to show a list of blog posts? You make that selection right here:

Settings -> Permalinks ->
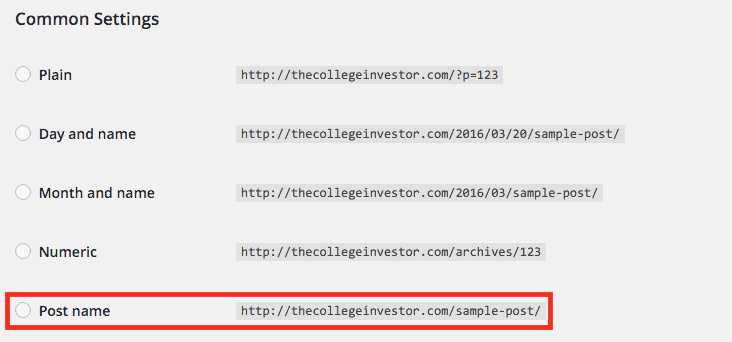
This is a technical one, but you need to change your permalink settings to Post Name. The reason is that this will display your URL in the best format.

2.4 Customizing The Look With Themes
Themes are what makes WordPress amazing. They give it the cool look that you can customize to meet your needs.
Think of your theme as the "skin" of your website. You can change the theme as often as you'd like (although that's not recommended from a consistency aspect), and it can be done in several mouse clicks.
WordPress offers a huge amount of free themes - which can work fine for most college students or those starting out building their first personal website. There are also paid or premium themes, which offer better support and sometimes better designs.
The College Investor uses a premium theme called Genesis, which was then customized by a designer. However, my very first theme when I started in 2009 was a free theme.
To change your theme, you simply go to Appearance -> Themes -> Add New

2.5 Customizing Your Website With Plugins
After you've chosen a theme, you can also customize your personal website with plugins. Plugins are essentially little programs that help your website be better. While none are required, the ones I'm going to list below are essential in my mind because of the value they add to your site.
Installing a plugin is incredibly easy. You simply go to Plugins -> Add New.
The essential plugins you need to just get started are:
Contact Form 7: This plugin allows you to create a simple contact form on your website.
Akismet: This plugin likely already was installed, but if it wasn't, add it. It blocks spam.
Google Analytics by Yoast: Just like it sounds, this plugin connects your website to Google Analytics and allows you to see what's happened on your website.
Growmap Anti-Spam Bot Plugin: If you allow comments on your site, this plugin will stop spam.
Simple Social Icons: This plugin creates nice little social icons so you can link up appropriately.
SumoMe: This plugin isn't totally a plugin, and can be setup here. This adds a bunch of cool stuff like sharing and email opt-ins to your site for FREE.
Yoast SEO: This plugin also helps improve the SEO on your website by following specific guides.
These plugins are just the start. If you want to do something on your site, there's probably a plugin for it. Just search around.

2.6 Creating Your Key Pages
Now that you have the infrastructure setup on your website, it's time to create the content. This is honestly the hardest part for most people - it requires you to think, be creative, and it can take time if you have a lot you want to say.
This guide is just going to provide you an outline to get started. There are truly limitless possibilities when it comes to creating content. That's something this guide can't teach you.
If you're starting a personal website, then here is what you MUST have:
- About Page - This should be a brief bio about who you are, what you do, and maybe what you want to do. Include pictures, that's important.
- Contact Page - Include a contact page. Use the plugin Contact Form 7 to help.
- Social Media Profiles - Always link to all your social media profiles. Use the Simple Social Icons to help. This can go a long way to differentiating yourself if you have a common name.
- Longer Bio or Resume - If you're leveraging this site as a personal website, include a full resume of everything you've done. The great thing about online is that you can link and include pictures as appropriate.
- Portfolio (if applicable) - If you're a designer or freelancer, you can leverage this site to showcase your work. Potential clients and employers love that.
- Blog (if applicable) - If you're trying to build a personal brand around a topic, you should definitely blog about it. Potential clients and employers want to know what you have to say about industry topics.
- Hire Me (if applicable) - If you're looking for clients, make sure you make it easy for them to find you.
- Press Mentions (if applicable) - If you've ever been "famous", and mentioned in press online or offline, include the mentions. People love to see that you've been recognized in the news.
That's just the beginning. You can also leverage your personal website to turn yourself into a personal brand. This works well if you blog consistently and have great content relating to a specific niche. Also check out our guide to why every college student needs their own website.
You're Done! You Built Your Own Personal Website
Nice job - you have now started your own personal website or blog. You've got the basics down, and now you can continue to add content for a lifetime to come.
Don't forget to share this awesome site with your friends, family, potential employers, and more. Include it on your resume and on your business cards. This can now be your home base online.
Remember, the great thing about WordPress and having your own domain is that this site can evolve over time. When you're graduating college, you can have this site serve as your online resume. But if you want to kickoff a freelancing career, or become a solopreneur, you can leverage this personal website to be your homebase for your business.
Either way, you've created an online personal brand for yourself, and you can continue to develop it over time.

Robert Farrington is America’s Millennial Money Expert® and America’s Student Loan Debt Expert™, and the founder of The College Investor, a personal finance site dedicated to helping millennials escape student loan debt to start investing and building wealth for the future. You can learn more about him on the About Page or on his personal site RobertFarrington.com.
He regularly writes about investing, student loan debt, and general personal finance topics geared toward anyone wanting to earn more, get out of debt, and start building wealth for the future.
He has been quoted in major publications, including the New York Times, Wall Street Journal, Washington Post, ABC, NBC, Today, and more. He is also a regular contributor to Forbes.
Editor: Clint Proctor Reviewed by: Claire Tak